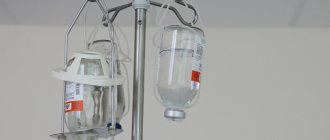
Placing an intravenous drip is one of the methods of infusion therapy with drugs that are available in the form of an injection solution. The use of this method of treatment allows you to speed up the process of delivering the active substances of the drug to the patient’s body.
Intravenous drips are used as part of complex therapy or as an independent drug. The algorithm for setting up the infusion system is carried out in accordance with the regulatory requirements of SanPin 2.1.3.2630-10.
Indications for placing an intravenous drip, goals
The algorithm for placing an intravenous drip is mandatory for medical workers of all categories.
This type of infusion therapy is indicated for use in the following clinical cases:
- myocardial infarction or exacerbation of cardiovascular diseases:
- bronchial spasm;
- severe exhaustion of the body caused by prolonged fasting or chronic disease;
- extensive allergic reaction (medicinal solution intravenous drip allows you to speed up the process of removing allergens from the patient’s blood);
- cerebral stroke;
- alcohol poisoning, overdose of drugs, food, biological poisons and chemicals;
- parasitic infestations (in this case, intravenous administration of drugs can significantly increase the likelihood of complete cleansing of the body with minimal stress on the liver and gastrointestinal tract);
- electrolyte imbalance;
- atherosclerosis of blood vessels;
- dehydration of the body;
- complex therapy of oncological diseases;
- prolonged vomiting or diarrhea;
- burns of large areas of the body;
- heavy blood loss;
- neurological diseases;
- inflammatory and infectious processes in the body.
The algorithm for placing an intravenous drip is enshrined in medical regulations. Infusion of drugs is prescribed to patients who have undergone surgery or severe trauma. Medicines entering the general bloodstream accelerate the process of tissue regeneration, prevent inflammation and the development of bacterial infection.
Puncture sites
Setting up an intravenous drip involves injecting a medicinal solution.
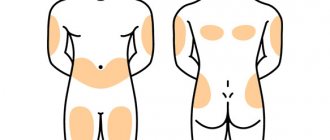
Depending on the condition of the patient’s blood vessels, the following areas of the body can be used to perform the puncture:
- the forearm, where the ulnar vein passes (this site for injection of drugs is used in most cases);
- the outer side of the hand, if it was not possible to perform a puncture in the forearm area;
- the upper part of the foot (this area of the lower limb is used extremely rarely).
In emergency situations, when the patient is unconscious, urgent medical care is required; puncture with a needle of the infusion system can be performed into the jugular vein. Installing an IV in this area of the body requires a high level of qualification from a medical professional.
Patient preparation
The algorithm for placing an intravenous drip requires mandatory preparation of the patient.
In this case, you will need to perform the following steps:
- Explain to the patient that an intravenous drip will now be installed.
- Explain to the patient the purpose of infusion therapy.
- Make sure that the patient is not prone to allergic reactions to medications that will be infused into his general bloodstream.
- Invite the patient to visit the toilet to empty the bladder. During the intravenous infusion, additional fluid will enter the body, which will activate kidney function.
- Help the patient take the most comfortable position, based on which vein the medication will be infused into.
At the final stage of preparing the patient, it is necessary to inquire about his well-being, as well as his readiness to install an intravenous drip. After this, you can proceed to the next stage of infusion therapy.
What is an anti-binge drip?
A drip is a procedure that provides rapid detoxification of the body, that is, the removal of toxins and breakdown products of ethyl alcohol. This is an infusion method of intravenous administration of medications that help cope with withdrawal symptoms.
It is prohibited to carry out such therapy on your own, since the composition of the dropper is selected personally. To do this, the narcologist examines and examines the patient and decides what should go into the IV. An incorrectly prescribed dosage can lead to deterioration of health and even death. It is faster to recover from binge drinking with a drip than with pills, since the medicine goes directly into the blood, while bypassing the digestive system and liver.
Preparing equipment and workspace
The table below presents a step-by-step algorithm for preparing equipment and workspace for placing an intravenous drip.
| Step by step procedure | Description of the workspace preparation process |
| Step 1: Check the infusion system. | At this stage, you will need to check the tightness of the packaging in which the system is located, as well as its expiration date. |
| Step 2. Assessing the external characteristics of the medicinal solution. | The medical professional is required to read the name of the drug, its expiration date, check the presence or absence of sediment, and the degree of transparency. |
| Step 3. Opening the package with the system. | It is necessary to unpack the sterile bag with the intravenous infusion system, and then place it on the work surface. |
| Step 4: Set up a tripod. | A tripod should be placed near the patient’s bedside, on which a bag or bottle with a medicinal solution will be attached. |
| Step 5. Disinfect the bottle cap. | The final stage of preparing the workspace and equipment is the antiseptic treatment of the stopper of the bottle with the drug. To do this, use sterile cotton wool and ethyl alcohol. Then the bottle with the infusion solution is fixed on a stand. |
After completing the preparation of the workspace and equipment, the medical worker can proceed to the next stage of setting up the intravenous infusion, which includes a set of medications, as well as connecting the system to the patient’s general bloodstream.
Preparing the System and Related Accessories
Before installing an IV, you need to prepare everything you need:
- Install the drip stand. It is a mobile stand with hooks on which bags or bottles with the administered drug are hung. Its height usually exceeds 1.5-2 meters, which ensures sufficient pressure
- Check the containers with the injected liquid. It is necessary to check the volume, type of drug, time of administration, expiration date and other significant indicators with the doctor’s prescription.
- Choose a suitable system. There are several types of droppers designed for different purposes, but all of them can be divided into 2 types: micro- and macro-sets, differing in the diameter of needles, tubes and speed
- Decide on the needle size. It is inversely proportional to the number, the fourteenth is the largest needle, the twenty-second is the thinnest
- Prepare related accessories. You will need a tourniquet to find the vein, antiseptic liquid (alcohol is usually used), cotton wool and a plaster to fix the needle in the vein.
Having everything necessary in place, a nurse with special knowledge, skills and sufficient practical experience will place an IV at home in a matter of minutes, without causing pain to the patient. There are also no bruises, scratches or other visible damage left after the work of a qualified professional.
IV catheters
In the process of intravenous infusion of medicinal solutions, standard dropper systems and cubital catheters can be used. The latest medical product is used in hospitals of healthcare institutions. Cubital catheters are inserted into the vein cavity, and its upper part is fixed with a plaster on the surface of the arm.
Such manipulations are performed if the patient requires frequent and prolonged administration of medications through the use of intravenous drips. The infusion system is connected to the connector of the cubital catheter. The advantage of using this therapeutic technique is minimal trauma to the patient’s venous vessels.
Types of IVs for binge drinking
At the Alcocenter drug treatment clinic, patients are offered four types of drips:
- Standard is a universal solution that is suitable for treating binge drinking, hangover and delirium tremens.
- Double is used for the development of withdrawal syndrome, which arose due to prolonged use of alcohol.
- Vip cleansing helps to effectively quit binge drinking and normalize the acid-base balance within one day. For this purpose, means are used that are more expensive.
- Emergency sobering up is a drip administration of medications that accelerate the removal of alcohol from the blood and internal organs.
Algorithm for placing an intravenous drip according to GOST
The algorithm for placing an intravenous drip includes the preparation of a medical worker before performing therapeutic manipulations.
Preparation for the procedure
Preparation for the installation of an intravenous drip involves performing the following actions, enshrined in SanPin 2.1.3.2630-10:
- Wear a mask.
- Perform an antiseptic treatment of the skin surface of your hands, and then wait until the disinfectant solution dries completely.
- Wear disposable gloves, which must be sterile. The packaging with this type of consumable material is opened immediately before installing the dropper.
The next stage of setting up an intravenous infusion is the collection of a drug with the connection of a sterile system to the patient’s general bloodstream.
Drug kit
Recruitment of the drug is an important step in setting up an intravenous drip.
In this case, the medical professional is required to perform the following actions:
- Open the package with a sterile syringe.
- Draw into the syringe the required amount of the drug prescribed by the attending physician as the main or auxiliary means of infusion therapy.
- Add the medication to the infusion solution, which is in the bottle. These actions are performed by puncturing a rubber stopper that has undergone preliminary antiseptic treatment.
- Dispose of the disposable syringe.
The selection of the medicinal product, as well as its mixing with the infusion solution, must be performed at the stage when the tripod has already been installed, and the bottle with the medication is attached to it. When filling a syringe with an injectable drug, the healthcare worker must ensure that no air bubbles enter the therapeutic agent.
Executing the procedure
Correct implementation of the therapeutic procedure for installing an intravenous drip ensures that the patient receives the required dose of the drug, shortens the time for his full recovery, and also minimizes the risk of complications.
Setting up an infusion system requires compliance with the following algorithm of actions:
- Close the screw clamp of the intravenous drip.
- The needle, which is connected to the infusion system, must be inserted all the way into the rubber stopper of the glass bottle with a buffer solution and medications.
- Turn the bottle of medicine down and check that it is securely fixed on the tripod.
- Using the physical strength of your fingers, squeeze the tube of the infusion system so that it is half filled with the medicinal solution.
- Open the cap of the intravenous drip.
- Open the pre-closed screw clamp.
- Make sure that the infusion system is gradually filled with the medicinal solution, completely displacing air bubbles.
- Make sure that drops of medication begin to flow from the capped needle.
- Perform a control check of the intravenous drip for possible presence of air bubbles inside the solution bottle and plastic tube.
- Close the infusion system clamp again. These actions are performed to eliminate the factor of air getting inside the dropper.
- Attach the infusion system to the stand.
- Place cotton wool and an alcohol-based antiseptic solution in a sterile tray.
- Cut a strip of adhesive tape 4 to 5 cm long and about 1 cm wide.
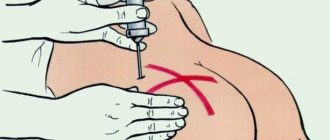
- Palpate the patient's vein into which the puncture will be performed. These steps must be performed to ensure that the blood vessel is in normal condition.
- Apply a tourniquet to the surface of the middle third of the patient’s shoulder, and then ask the patient to clench and unclench his fist several times.
- Treat sterile disposable gloves with an ethyl alcohol solution.
- Disinfect the skin of the hand in the puncture area. To do this, use antiseptic wipes or sterile cotton wool soaked in alcohol.
- Using your thumb, secure the venous vessel below the area of intravenous injection.
- With your right hand, insert the needle of the infusion system into the vein, holding its end with the cut facing upward.
- Make sure that dark red blood appears in the needle cannula. This phenomenon indicates that the puncture was performed successfully, and the infusion system is connected to the patient’s general bloodstream.
- Fix the needle of the intravenous drip on the surface of the patient's arm. For these purposes, a piece of adhesive tape that was prepared earlier is used.
- Ask the patient to unclench his fist.
- Untie the fixed tourniquet to restore normal blood circulation in the vessels of the upper limb.
- Open the screw clamp.
- Use the wheel to adjust the speed of infusion of the medicinal solution. In most cases, a rate of 40 to 60 drops per minute is selected. depending on the pharmacological properties of the drug.
- Begin the process of introducing the medicinal solution into the patient’s general bloodstream.
- Moisten a sterile antiseptic wipe with ethyl alcohol, and then cover the needle of the infusion system. In this case, the risk of infection of the patient’s blood is minimized.
- Remove disposable sterile gloves from your hands, and then place them in a plastic bag that does not allow moisture to pass through.
- Treat the skin of your hands with a solution of ethyl alcohol
- Wait until the disinfectant dries completely.
Throughout the entire period of infusion of the medicinal solution, the medical worker monitors the therapeutic process. A mandatory rule for placing an intravenous drip is monitoring the general condition of the patient. Particular attention is paid to the symptoms of an allergic reaction to the administered medication.
If signs of urticaria, itching of the skin and mucous membrane of the eyes, or bronchial spasm occur, further intravenous infusion should be immediately stopped. After this, the patient receives symptomatic therapy aimed at stabilizing body functions.
End of the procedure
The by-law SanPin 2.1.3.2630-10 states that upon completion of the procedure for placing an intravenous drip, a medical worker is required to perform the following actions:
- Treat the skin of your hands with an ethyl alcohol-based antiseptic solution.
- Wear disposable sterile gloves.
- Close the screw clamp of the infusion system.
- Apply sterile cotton wool to the injection site.
- Ask the patient to bend his arm at the elbow for 5-7 minutes to prevent venous bleeding.
- After 10 min. it is necessary to check that no blood is coming out of the patient’s vein.
- Recycle consumables.
- Treat the surface of your hands with an alcohol antiseptic.
The final stage of therapeutic manipulation is filling out the nursing “Procedure Log”, which indicates the time of infusion therapy, the type of drug, as well as the general well-being of the patient.
How to place an IV
Preparing for placement Prepare a convenient place in the apartment for placing the IV. It is more convenient for the animal to drip on the table; you can put a blanket or a disposable diaper on the table. Prepare a bottle (bag) for drip infusion with the required (measured) amount of solution for infusion. Draw medications for jet injection into syringes in the required dosages. If necessary, separate them. Sign the syringes with filled medications with a marker (name of the drug). Prime the drip system as follows: 1. Open the drip system package. 2. Close the roller clamp by moving it down. 3. Remove the protective cap from the bottle needle and insert the needle completely into the bottle of infusion solution, piercing the rubber stopper on the bottle. 4. Hang the bottle with the solution for the dropper above the table on a nail, cabinet handle or other suitable object at a level significantly higher than the table, otherwise the dropper will not drip. 5. Next, with two fingers, squeeze and release the sub-needle area (filter) several times so that it is half filled with the solution. 6. To release air from the system, open the roller clamp until solution comes out of the system. 7. Make sure there is no air (air bubbles) in the system. If there are any, then open the clamp again and wait until the air bubble comes out of the system. Placement of the IV
1. Place the animal on the prepared table on its side. 2. Unbandage the catheter. 3. Flush the catheter. The solution for flushing the catheter is prepared as follows: take a 5 ml syringe, fill the syringe with 0.9% NaCl (saline solution) to 5 ml. To flush the catheter, open the upper valve of the catheter (2), connect a syringe without a needle with a rinsing solution to it and inject 2-3 ml, close the valve. If there is no upper valve in the catheter, then the catheter is flushed through a cannula for connection to the drip system (1). 4. Unscrew the catheter cap (on the side) and connect the cannula of the drip system (without a needle) (1) 5. Open the clamp and turn on the drip (3). Adjust the speed of solution administration. The average rate of administration of the solution for a cat is 20 drops per minute, i.e. administration of 100 ml of solution should take an average of 2 hours. 6. During the dropper, inject additional drugs into the gum (4) (syringe with needle). All drugs are administered slowly! 7. When all the solution has dripped, turn off the dropper by closing the clamp (5). 8. Disconnect the cannula of the drip system from the catheter (1), screw on the catheter cap. 9. Open the top valve of the catheter (2), rinse the catheter (see point 3). Close the valve. 10. Bandage the catheter. Attention! If swelling of the paw, redness, local increase in temperature, obstruction of the catheter, leakage, or pain occurs in the animal, you must immediately contact the clinic.
Possible complications and first aid
During intravenous infusion, it is necessary to constantly monitor the patient's condition.
In this case, the following complications cannot be excluded:
- formation of an extensive hematoma in the area of drug administration;
- penetration of the infusion solution into the subcutaneous tissue, which causes burning pain;
- infection of venous blood with bacterial, viral or fungal microorganisms, if the medical worker did not comply with sterility standards;
- the development of gas embolism, which is caused by the entry of air bubbles into the general bloodstream.
The last complication of infusion therapy entails loss of consciousness followed by death. Similar consequences are possible if during the execution the nurse did not make sure that there was no air inside the system.
The algorithm for placing an intravenous drip is regulated by the by-law SanPin 2.1.3.2630-10. This document contains a set of rules and regulations governing the procedure for conducting infusion therapy. Before starting intravenous infusion of a medicinal solution, a medical worker must perform antiseptic treatment of hands, prepare the work area and the patient.
The placement of an intravenous drip is carried out under strictly sterile conditions. All manipulations are performed using disposable gloves. Throughout the entire period of drug administration, the nurse monitors the rate of infusion of the medication and inquires about the patient’s well-being. After completion of the intravenous infusion, all consumables are discarded.