Manufacturing
At the first stage, you need to attach the handle of the mop to the back of a heavy chair. This can be done using electrical tape, adhesive tape or adhesive tape. You need to fasten it firmly so that a full bottle of saline solution does not overweigh the structure or tilt it.
At the end of the handle there is a special hook for hanging the mop, which will also be useful to us.
To secure the bottle to the top of the handle, you will need a sock. In the part where your fingers should be, cut a small hole for the neck of the bottle.
First, insert the bottle into the sock. Then put the sock through the eye of the handle and tie it.
All that remains is to connect the system itself for intravenous administration and you can begin medical manipulation, being sure to follow all antiseptic rules, because at home there are more different bacteria than in a hospital setting.
Source
Choosing pipes and organizing drip irrigation with your own hands
Timely watering of flowers and plants allows you to turn your garden into a floral oasis and get a high yield. Most often, gardeners use drip irrigation from polypropylene pipes, which delivers water directly to the root system of plants. Read on to learn how to select pipes for an irrigation system and make it yourself.
Drip irrigation system in the garden
Materials for making an irrigation system
To make your own drip irrigation system for plants, you will need:
- pipes for central water supply;
- droppers;
- tape for supplying water to plants. The tape is a small diameter pipe with holes for attaching droppers.
Irrigation tape
- a pipe plug, which is installed at the end of the system;
- shut-off valves for the pipeline;
- filter for purifying incoming water;
- drill with a set of drills;
- awl;
- pliers;
- sealant.
Pipe selection
Currently, you can purchase the following pipes for drip irrigation:
- rigidity;
- ease;
- ease of assembly and strength of the resulting connections;
- resistance to temperature changes. Water in a pipe can freeze and thaw without damaging the pipeline;
- resistance to corrosion and external factors;
- low cost.
PVC pipes
Polypropylene pipes are more expensive than PVC and have a longer service life. The pipes themselves are durable and lightweight, not susceptible to precipitation, excessive humidity and corrosion.
An irrigation system made from HDPE pipes will not last long, since the fairly soft material is easily destroyed by any mechanical impact and high temperature.
Polyethylene pipes for water supply system
Which drip irrigation pipe should I use? There is no fundamental difference between the materials, since the water supply is used only in the warm season and for supplying cold water.
Selection of droppers
For a drip irrigation system made of plastic pipes, you need to select droppers. Currently, the following types of droppers can be purchased in specialized stores:
- adjustable. If necessary, the user of the system will be able to independently increase or decrease the amount of water supplied to the plants;
An irrigation device in which you can independently adjust the water supply
Dripper with fixed water supply intensity
- spiders. Such devices are equipped with several outlets that can water several plants at the same time.
Device for simultaneous watering of several plants
A drip at home does not cure alcoholism
It cannot be said that a drip allows you to completely recover from alcohol addiction and what follows. This can lead to an irresponsible attitude towards health. The patient begins to drink alcohol again, hoping that the drip will help again.
In reality, alcoholism poisons the organs with toxins all the time, and it will be difficult to cope with them with just a dropper. In order for the cardiovascular system, kidneys and liver to function normally, certain medications are needed, and it will not be possible to use them all in one dropper. This requires comprehensive treatment in a drug treatment clinic, where, if necessary, the person suffering from alcohol addiction will be coded. It is only necessary that the patient completely stop drinking alcohol and agree to undergo treatment.
The process of making your own irrigation system
The process of making a drip irrigation system with your own hands is carried out in two stages:
Design
Before purchasing materials for a drip irrigation system, it is necessary to develop a drawing of the future system. The drawing indicates:
- the location of the container from which water will be supplied. Watering plants can be done from a well, pond, storage tank or other container. If the water intake site is located below the irrigation area, then the system must provide a pump that will pump the water;
- location of the filter and shut-off valves. The valve must be installed on the main pipeline. Additional taps can be placed on each drip tape;
- the location of the main pipeline, drip tapes and plugs, as well as the diameter of the pipes for individual mains.
Drip irrigation manufacturing project
Manufacturing and installation
After developing the project, preparing all materials and tools, you can begin the actual production of the irrigation system, which consists of the following steps:
- Markings are applied to the main pipeline pipe for attaching tapes. All holes should be located in the same plane so that the finished system does not turn over and looks neat. When marking pipes, it is important to take into account the distance between the beds to which watering will be directed;
- Holes are drilled according to the markings. For drilling, you must use a drill whose diameter matches the diameter of the fittings used;
- A branch fitting is installed in each hole. When fastening system elements, it is necessary to use sealant or sealing gaskets to avoid unauthorized water leakage;
Installation of fittings for connecting drip tapes into the main pipe
- The central main is connected to the water supply source. Shut-off valves and a filter are installed in the selected location;
- Droppers are installed on drip tapes. To do this, holes are made in the required place using an awl or other available tools into which droppers are inserted. To make the connection stronger, you can heat it with a hairdryer;
Preparing drip tapes for laying
- prepared tapes are laid;
- the tapes are connected to the main pipe;
- plugs are installed in the required places;
- The functionality of the irrigation system and the tightness of all installed elements are checked.
How to make a drip irrigation system with your own hands, watch the video.
Thus, with little money and time, you can independently ensure constant watering of plants in your garden plot.
Source
Introduction
The bottle with the solution is raised to a height of at least 1.5 m - installed on a tripod or suspended in another way available at home. The prepared tools should be located within reach.
Tip: the optimal place for self-infusion is the bend of the elbow or the front side of the palm. It is easier to find veins there, because the needle must clearly enter the venous vessel. Veins of the lower extremities are not recommended due to the increased risk of blood clots.
How to place an IV:
- pull your hand 10-15 cm above the elbow with a tourniquet, clench your hand into a fist and place your hand on a hard surface. Feel for the most visible and largest vein. Disinfect the injection site.
- Place the system in the working position - press the selected vein with the thumb of your left hand (fix it) below the intended injection site. With your right hand, take the needle that is installed at the second end of the system, direct its cut and pierce the skin parallel to the vein, and then the vein itself at an angle of 45º. When it enters a venous vessel, you will feel a “failure”. Secure the device with a bandage at the point where it connects to the vein. If it is necessary to administer drugs intravenously for a long time, venous catheterization is performed. In any case, you need to find a suitable place and install a catheter;
- check the accuracy of the hit - dark red venous blood should appear from the other end of the needle;
- Lower the control wheel to select the optimal feed speed. If there are bubbles in the bottle, reduce it;
- release the tourniquet, unclench your fist. If a bulge forms at the insertion site of the IV, immediately close it and remove it from the vein.
At the end of the procedure, the regulator wheel is raised and the device is removed from the vein. The injection site is wiped with cotton wool soaked in alcohol and sealed with an adhesive plaster.
How to make a tripod from polypropylene pipes
In this review, the author shares an idea on how to make a tripod from polypropylene pipes. The design is collapsible, which simplifies transportation.
You can use a tripod either in conjunction with a construction laser level or to mount other devices, including a camera.
The base of the tripod is a tripod. It is made of two couplings soldered together, three pieces of PP pipe and a metal tube.
Legs made from pieces of PP pipes and 90-degree angles are screwed into the nozzles. The author soldered plugs to the corners. There are threads cut inside the soldered pipes and at the ends of the legs.
Design Features
After assembling the tripod, we put a polypropylene pipe on the metal tube - this is the tripod stand.
A movable carriage made of a tee, two clips and a fixing bolt is put on the stand.
A platform for a laser level or camera is attached directly to the carriage.
You can also use another mount that is installed on the top of the rack. To do this, you will additionally need to make an adapter.
For details on how to make a universal collapsible tripod from polypropylene pipes with your own hands, watch the video on our website.
Source
Rack design
Anyone who has been in a hospital at least once has seen such a tripod with their own eyes. Apart from minor details, this device consists of three main elements.
What does the IV stand consist of:
- Tripod or base of any other configuration. The main requirement is to ensure the stability of the structure, so that even with an accidental touch or push, the medicine will not spill or break.
- The medicine holder is located at the very top of the tripod. A universal stand for a dropper should provide for the location of standard bottles with solutions and medications that are intended for intravenous administration. There are usually two types of dosage forms: a glass or plastic bottle with different volumes, or a plastic “bag”. The bottle is installed in detachable cells of the appropriate diameter. The bag of medicine can simply be hung on the hook through a specially provided hole.
- Vertical stand - a tripod connects the support and fastening parts, providing the height necessary for infusions. The components of a drip stand, which you can make yourself, should also perform all of the above functions. Therefore, we will take exactly three elements as a basis.
Floor stand made of plastic pipes for antiseptic
For convenient use of antiseptic or liquid soap, the author suggests making a floor stand from plastic pipes with your own hands.
Moreover, the design of the stand additionally provides a foot pedal - in order to squeeze out the required amount of antiseptic (or liquid soap), you just need to press it.
We also recommend reading how to prepare a simple, effective antiseptic at home.
To make a floor stand, we will need pieces of plastic pipe for water supply, as well as fittings (tees and angles), and some other materials.
How to make a tripod at home
First of all, it is necessary to determine the location of the patient. Typically, such manipulations are performed in a supine position to ensure maximum peace and comfort. It is necessary to install a stable support on the side convenient for the patient. At home, an ordinary chair with a back will cope well with this role. It is to the vertical support of the chair that the tripod will be attached.
You can use any stick or small diameter metal pipe as a stand. Usually a mop handle or an old curtain rod is used. To ensure the most reliable fastening, it is better to use mounting clamps. Using adhesive tape or insulating tape for this is not a very good idea, since you will subsequently have to wash off the adhesive residue from the furniture, which is not very easy to do.
The most crucial moment is the choice of fasteners. Here it is better to focus on the form of the drugs that will be used. If we are talking about a plastic bag, it is enough to simply securely fix it in a vertical position with any available material or simply hang it on a temporarily installed screw. In such cases, it will be enough to simply attach the dropper to the cabinet door or attach it to the cornice. Light weight and ease of fastening will help you use any possible option.
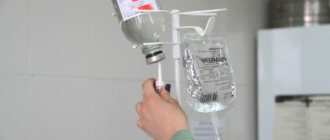
If a medical product for a dropper is available in bottles, it is necessary to ensure not only a strict vertical position, but also safety. Typically, at home, to securely hold glass bottles, it is recommended to use a plastic bottle with the bottom cut off. This way you can control the quantity and the opening of the neck will allow you to use the drip system without any problems. Even a nylon stocking is used for these purposes, but here it is necessary to make sure that the weight of the medicine will not be excessive.
A drip stand will provide convenient and, most importantly, safe administration of medication, so if there is a real need for constant infusions, you may need to think about purchasing a ready-made product. If these are temporary events, improvised items are quite suitable for these purposes. You can build such a stand at home using the most ordinary objects, the main thing is to ensure stability and securely fasten the medicine. One of the related issues has been resolved, and qualified medical care, doctor’s supervision and a comfortable “home” regimen will help you recover faster.
Main stages of work
The author drills the necessary holes in the tees and corners. After this, you will need to saw off a wooden block 28 cm long.
Next, we cut off small pieces of plastic pipe, take fittings and assemble the base of the stand from all this.
The master assembles the foot pedal from a wooden block, having previously drilled a hole in it, and a piece of reinforcement.
We insert a stand into the base of the structure. A plastic pipe of smaller diameter is inserted into it. We drill holes in it and attach it to the pedal using a metal rod.
Using a plastic tie, we attach one end of the spring to the rack. We attach the second end to a wooden block.
At the last stage, all that remains is to secure the “glass”, which will contain a container with an antiseptic, and install an additional structural element that will press on the dispenser cap.
Details on how to make a floor stand for antiseptic (or liquid soap) from plastic pipes can be seen in the video below. The idea was shared by the author of the YouTube channel Creative Life .
Source
What is needed to install an IV?
To install an IV at home you will need:
- sterile gloves, preferably surgical ones;
- water for injection or saline solution;
- a medical tourniquet to ensure blood flow and feel the vein;
- a drug that must be introduced into the body;
- a little cotton wool;
- a stable stand for hanging the dropper;
- disposable sterile syringe;
- antiseptic;
- system for infusion therapy.
Watch a video about how specialists place an IV.
How to install an IV at home: stages
First of all, you need to prepare the place where the patient will be located. It should be comfortable for staying in one position for a long time. There should be room for a medicine stand and a couch, sofa or chair for the patient. It is important that the tripod with the bottle suspended on it stands securely and does not wobble.
Do-it-yourself drip irrigation from polypropylene pipes
The peculiarity of the drip irrigation system is that moisture supplied through a special polymer tape or droppers is delivered directly to the root system of plants. Thanks to this, the overall water consumption is reduced and at the same time the crop yield increases. In addition, drip irrigation does not lead to waterlogging of the soil and reduces the likelihood of weeds appearing - they do not receive enough moisture.
It’s not difficult to create a similar system in your own garden. This article will provide you with detailed step-by-step instructions for designing and installing drip irrigation using polypropylene pipes.
Features of detoxification of the body from alcohol
The peculiarity of this procedure is that under the influence of drugs, ethanol and acetaldehyde are released from the alcoholic’s body. To improve his condition, in addition to the IV, other medications may be prescribed. But this is done only after a thorough examination of the patient, collection of all tests and data.
If a person is addicted to alcohol, the doctor will suggest continuing standard treatment, which includes alcoholism coding and rehabilitation. The method of getting rid of a bad habit is chosen individually for each patient. Treatment at home is also possible.
It is also important to understand that the IV will give good results only if the patient does not have serious health problems. So, contraindications to this procedure will be:
- drunkenness that lasts more than 7 days;
- diseases associated with the cardiovascular system;
- diabetes;
- advanced age;
- development of alcoholic psychosis; asthma.
In such cases, our doctors will have to admit the patient to the clinic for emergency medical care. If this is not done, complications may arise that can result in death. It is impossible to leave a person to be treated at home. Indeed, in case of severe poisoning, urgent medical intervention is required.
Note! Detoxification of the body and infusion therapy are not a panacea for chronic alcoholism. They are able to alleviate the consequences of drinking strong drinks, but they are not able to completely solve this problem. If an alcoholism problem arises, treatment is carried out in a hospital. In some cases, it is possible at home. This is already decided by the doctors who come to the call.
If the alcoholic does not have serious illnesses, then treating alcoholism at home after ethanol intoxication has a number of undeniable advantages, including:
- There is a rapid recovery after binge drinking.
- After instillation, withdrawal syndrome does not develop.
- The procedure cleanses not only the blood, but also all organs.
- The body's functioning is normalized.
Polypropylene pipes - main characteristics
Compared to conventional metal pipes, polypropylene products have a set of advantages that make them a good choice for installing a drip irrigation system on a personal plot.
It is worth highlighting the following advantages of PP pipes:
- light weight;
- cheapness;
- ease of installation;
- no condensation;
- almost complete absence of deposits on the internal walls;
- service life is about 50 years.
In order to standardize characteristics, all polypropylene pipes are marked, dividing them into four groups.
- PN10 - pipes designed only for cold water (up to +45 degrees) and exclusively at pressures up to 10 atmospheres. Due to relatively weak characteristics they are rare.
- PN16 - pipes designed to operate at pressures up to 16 atmospheres and temperatures up to +60 degrees. Suitable for drip irrigation system.
- PN20 – maximum operating pressure is 20 atmospheres, can withstand temperatures up to +95 degrees.
- PN25 - the permissible temperature is similar to the previous type; the pressure in them can reach up to 25 atmospheres. They are equipped with reinforced layers that increase the strength of the pipe.
In drip irrigation lines, the operating pressure does not exceed 2-3 atmospheres, and the water temperature is equal to or lower than the ambient air temperature. Therefore, polypropylene pipes PN10 and PN16 can be used here. The use of PN20 and PN25 is acceptable, but their characteristics are redundant for such a system.
Prices for polypropylene pipes
Do-it-yourself drip irrigation - making a plan
This system consists of several elements; let’s get acquainted with the features of each of them.
- Water container . On one side it is connected to the drip irrigation pipes, on the other – to the water supply from which it is replenished. Necessary for storing water and heating it under sunlight to a temperature close to that of air. The presence of a container is mandatory, since when connecting drip irrigation lines directly to the water supply, the moisture reaching the plants will not have time to warm up and will be too cold. As a result, crops will experience “stress”, which will affect their condition and productivity.
Designing drip irrigation for a greenhouse or garden plot is divided into several steps, performed sequentially.
Step 1. Determine the area of the site for which you need to install drip irrigation. Take measurements, calculate the number and length of the beds, the distance between them, as well as the number of plants on each of them.
Step 2. Calculate the amount of water required to water all crops on the site. On average, one square meter requires from 15 to 30 liters of water per day. Calculate more accurate values using the table below.
Table No. 1. Daily water requirements of some crops.
| Type of crop | Water consumption, l/day |
| Tomatoes, one bush | 1,5 |
| Cucumbers, one bush | 2 |
| Potatoes, one bush | 2,5 |
Please note that water consumption for each individual plant is not constant. The value varies depending on average temperature, precipitation levels and the characteristics of the soil in which the crops grow. Excessive watering is just as harmful as insufficient watering, since it leads to rotting of the plant roots.
Step 3. Based on the figure obtained at the previous stage, determine the volume of the water tank and the cross-section of the main pipeline. The table below shows the maximum possible liquid flow rate depending on the pipe diameter. Select the volume of the tank and the cross-section of the main line with a small margin according to the characteristics. This small reserve may be needed if water consumption for irrigation increases.
Table. Dependence of the maximum water flow on the diameter of the pipeline.
| Pipe diameter, mm | Water consumption, l/hour |
| 16 | 600 |
| 20 | 900 |
| 25 | 1800 |
| 32 | 3000 |
| 40 | 4800 |
| 50 | 7200 |
Step 4. Determine the number and length of branches connected to the common main line. If drip irrigation tape is used as a direct means of delivering moisture to plants, then proceed from the rule: one bed - one outlet with tape. And when using polypropylene pipes and drippers from one outlet, you can provide watering to two beds at once.
If there are long lines and branches, a pump must be used to maintain pressure in the system.
Step 5. Determine the distance between the droppers connected to the bends of polypropylene pipes. One dripper can “feed” two plants in one bed (or four when the outlet is located between adjacent beds) if there is an appropriate adapter.
Step 6. Take a double squared notebook sheet or graph paper and draw a sketch of the future drip irrigation system. Transfer to it the location of the water tank, fertilizer container, tap, filter, main pipe, tee fittings and bends.
Step 7. Calculate the amount of materials needed to install the irrigation system. The layouts and sketches created at the previous design stages will help you with this.
Installing the container
The water tank must be located at a certain height so that the force of gravity acting on the liquid creates pressure in the pipes of the drip irrigation system. On average, the container is raised to a height of 2 meters - thus, the pressure in the line is sufficient for effective watering of 40-50 square meters. If the area with beds has a large area, then either the tank is raised higher or a pump is installed in the main line.
Step 1: Build a support for the container. The easiest way to make it is from timber with a large cross-section and thick wide boards. Drive the beam to a certain depth into the ground, lay the boardwalk on top. For greater strength, install crossbars between the supports. Instead of timber and boards, you can use bricks or steel pipes.
Step 2. Mount the connection to the drip irrigation line on the container. Install the fitting and tap at a height of 5-10 centimeters from the bottom of the container - this will prevent large particles of dust and dirt from getting into the pipeline.
Step 3. On the opposite side of the container, install a connection to the water supply. Use a shut-off valve with a float mechanism - the device will automatically open to refill the tank and close when the water level reaches its maximum.
Step 4: Lift and place the container on the support. Postpone the direct connection of the tank to the water supply until the last stage of arranging the drip irrigation system.
An open tank can be used as a container - in this case it will be partially replenished by rain. But at the same time, take care to install a good filter - along with precipitation, a lot of dust, debris and leaves will get into the container, which can cause the pipes to become clogged.
Laying the main line and branches
Since polypropylene pipes are used as the material for the main line and branches, you need to become familiar with how to properly cut and connect them to each other.
You can get a clean cut without burrs or deformations using special pipe cutters designed to work with plastic products. If for some reason it is impossible to purchase such a tool, then as an alternative, use a hacksaw or, when working with small-section pipes, a sharp stationery knife. But at the same time, the quality of the cut will decrease, and this will not affect the durability of the pipe and the quality of the connection with other elements of the system.
Things are more complicated with the connection of polypropylene pipes with fittings and other elements.
There are three ways in total:
- using soldering;
- using crimping;
- using cold welding.
The first method provides a strong and durable connection that can withstand high pressure in the system. But for it you will need a special soldering machine with a set of attachments and some skills in working with such a tool.
Step 1. Inspect the fitting and pipe section for defects or defects.
Step 2. Degrease the outer surface of the pipe at the intended joint and the inner surface of the fitting.
Step 3. Install the appropriate nozzle on the soldering tool - the hole in the pipe part should correspond to the outer diameter, and in the fitting part - to the internal section.
Step 4. Warm up the soldering tool and nozzle.
Step 5. At the same time, insert the pipe and push the fitting into their corresponding parts of the nozzle. Wait for the time specified in the instructions for the tool. The soldering iron will heat the outside of the pipe and the inside of the fitting.
Step 6. At the same time, remove the fitting and pull the pipe from the nozzle and connect them to each other to the heating depth. Hold for five seconds, then allow the connection to cool for some time.
The main disadvantage of using a soldering machine is the need for a soldering tool. It is quite expensive, and using it only once is impractical.
In addition, such a connection is non-separable. An alternative is to use compression fittings and a crimp wrench. However, in the case of polypropylene pipes, the quality and tightness of such a connection leave much to be desired. A simpler and cheaper connection method is “cold welding” using special glue.
Cold welding prices
Step 1. Examine the fitting and pipe for defects. If there are no defects, join without glue and mark the depth of the joint using a marker.
Step 2. Degrease and clean the bonded surfaces of the pipe and fitting.
Step 3: Apply glue to the outside of the pipe and the inside of the fitting.
Step 4. Connect the elements together. Make sure that they connect smoothly, without skewing to one side. They should be held in this position for 15 to 30 seconds. Water supply in such a connection is permissible only after 24 hours.
The pipelines of a drip irrigation system can be made detachable and easily dismantled using American type fittings.
Before starting the installation of the main line and branches, it is necessary to decide which method of pipe arrangement is preferable - surface or deep. In the first case, all elements of the system are simply laid on the ground (or above it using bracket holders). Pipes lying on the surface are easy to repair and replace, but they can also easily be damaged due to carelessness.
When buried deep, the main and auxiliary communications are laid in a narrow trench with a depth of 0.3 to 0.75 meters. In this case, inspection and maintenance of pipes becomes more difficult, but at the same time they do not interfere with walking around the site and harvesting crops from plants. Having decided on the location of the highways, you can begin to install them.
Step 1. Attach a fine filter to the water tank and ball valve. If you intend to install a container with fertilizers, a pump and a controller for automatic drip irrigation, install them.
Step 2. Using an elbow fitting and a piece of pipe of the appropriate size, bring the line to a height of approximately 5-10 centimeters above the ground. Install the holder bracket as a support.
Step 3. Cut pieces of polypropylene pipes according to the distance between the bends. Also take into account the “seams” between the parts of the line and the fittings.
Step 4. Consistently install and connect the sections to the tee fittings. At the same time, maintain the slope - the end of the highway should be closer to the ground than the beginning. This is necessary for effective drainage of water before the onset of cold weather.
Step 5. At the end of the main pipe, install either a plug or a ball valve. The latter is preferable because by opening it, you will be able to quickly drain water or clear the pipes of blockages that have accumulated in them.
Next, the list of actions depends on which type of outlet you have chosen - a drip tape or a tube with droppers.
How do IVs work? What does it contain?
First of all, the narcologist puts in an IV with a glucose-saline solution. In this case, glucose alternates with saline. It helps thin the blood and reduce alcohol levels. By the way, such solutions have a diuretic effect.
Also, during withdrawal symptoms, problems with the cardiovascular system and metabolism are often observed. As a rule, this occurs due to a lack of potassium, magnesium and sodium ions. The first aid for such an imbalance is instillation of polyonic solutions of crystalloids. This can be either “Acesol” or “Disol”. The required amount is determined by the doctor.
Due to the high content of ethyl alcohol breakdown products in the body, the patient develops acidosis (disturbance of the acid-base balance). A solution with potassium bicarbonate helps restore it.
After all previous procedures have been completed, the stage of detoxification and cleansing begins. To completely remove alcohol from the blood, droppers with medications such as Mefusol and Reamberin are placed. They may add:
- succinic acid;
- components of the Krebs cycle;
- fumaric acid.
If the amount of alcohol consumed is too large, it can negatively affect the opiate receptors in the brain. Because of this, breathing stops; to prevent this, a drip with the addition of Naloxone is placed.
Also, during heavy drinking, the liver suffers greatly. To restore it, Essentiale is administered intravenously.
Also, the doctor includes vitamin complexes in any composition of the dropper. This is an essential element that helps in withdrawal from binge drinking and cleansing the body of toxins.
Treatment of chronic alcoholism requires an integrated approach and this cannot be done at home.
In order to find out the cost of an IV and get a consultation, you can call or fill out the feedback form. The call is free of charge. The manager will call you back within five minutes and tell you the price of the service. If the conditions are suitable, the doctor will visit the patient’s home within an hour.
Author of the article: Yakovlev Evgeniy Anatolyevich
Narcologist, Candidate of Medical Sciences.
Option #1. Drip tape
First, let's look at the option with tape. The thickness of its walls and the spacing of the holes are selected depending on what crop is planned to be supplied with moisture.
Table No. 3. The spacing of holes on the drip tape depends on the crops being grown.
| Step, centimeters | For which agricultural crops is it suitable? |
| 10 | Carrots, onions, garlic |
| 20 | Cucumbers, strawberries and wild strawberries |
| 30 | Cucumbers, tomatoes, potatoes, eggplants |
| 40 | Melons |
The sequence of actions is as follows.
Step 1. Install start connectors with taps to the tees perpendicular to the main line.
Step 2. Divide the drip tape into parts equal in length to the length of the beds (with a small margin).
Step 3. Fix one end of the drip tape in the start connector.
Step 4. Cover the other end of the drip tape with a cap or roll it up and tie it with insulating tape.
Drip tape is not best suited for areas where birds and rodents are found in large numbers, which can easily damage its thin walls.
Drugs used
Depending on the age, gender and condition of the patient, the narcologist will select the desired composition of the dropper. Before placing it, the doctor first examines the patient, asks how long this condition has lasted, inquires about existing diseases, and measures blood pressure. Then, after making sure that there are no contraindications, he selects the appropriate treatment. As a rule, when quitting a binge, the following are used:
- isotonic solution;
- five percent glucose solution;
- vitamin preparations;
- saline solutions.
Such drugs allow the body to get rid of ethanol breakdown products and toxic substances, restore water-salt metabolism and metabolism. If the patient complains of frequent headaches and suffers from insomnia, then sedatives and nootropic drugs are added to everything else. How much solution to inject, how long to leave the dropper in place, all this is decided by a specialist. Usually the dropper is placed for about forty minutes, and the patient will feel the effect of it within fifteen minutes.
Option #2. Tube with droppers
In the second case, you will need small-diameter polypropylene pipes (for example, 16 cm for small beds), an adjustable dripper with bends, flexible tubes with a cross-section of 3-5 mm and turbulent stands. One outlet can have 1, 2 or 4 outlets, respectively, one dropper can supply 1, 2 or 4 bushes with moisture.
Step 1. Using soldering or cold welding, attach branch pipes to the tees perpendicular to the main.
Step 2. Drill holes in the outlet pipe at a certain pitch. The diameter of the holes must correspond to the diameter of the dropper seal.
Step 3. Insert the dropper seal into the hole, then the dropper itself. Next, mount the branch and connect to it the appropriate number of flexible tubes with turbulent struts at the end. Then insert them into the ground next to the plants.
Step 4: Install a cap at the end of the outlet pipe.
Step 5: Repeat the previous two steps with all the holes on the outlet pipes.
The final stages of installing a drip irrigation system are connecting the tank to the water supply, filling it with liquid and a kind of stress test, during which you need to make sure that all elements of the system are working properly.
For a better understanding of the drip irrigation system, we recommend that you watch the following video.
Video - How to make drip irrigation with your own hands
Automation of a drip irrigation system
Today, manual control for a drip irrigation system is impractical - it requires daily presence on a personal plot, which can only be ensured in cases where you either live there or have enough free time to come there every other day.
The simplest option for automating the system is to install a specialized microcomputer. It consists of a programmable controller, a set of chips with memory, an LCD display, control buttons and a housing that is resistant to moisture and temperature changes. A microcomputer is installed on the central line and a regular watering program is set in it. Switching on and off is carried out using solenoid valves, replacing conventional ball valves.
Prices for controllers for automatic watering
But such a system does not take into account the state of the environment, so there is always a risk that the plants either do not receive the required amount of moisture or receive it in excess. The solution to this problem is to install a set of weather and humidity sensors. Depending on the weather and soil moisture, the watering program will be adjusted to increase or decrease the volume of water directed to each plant.
DIY drip irrigation from plastic bottles
The structure of such a system is as follows: a plastic bottle with small diameter holes is dug in near each individual plant in the greenhouse. Read more in this article.
A drip irrigation system based on polypropylene pipes and droppers will not only free you from work related to supplying plants with water, but will also help to significantly increase their growth rate and productivity.
Contraindications for use
A drip is an indispensable tool for detoxification. A drip against binge drinking at home improves the patient's sleep, promotes appetite, and cleanses the body of harmful substances and toxins. After the body has been cleansed, at the request of family members or the patient himself, the coding procedure can be carried out. Although the narcologist selects the right composition personally for each patient, there are still a number of contraindications that must be taken into account during treatment. You need to be especially careful when using this cleansing method if:
- the patient is elderly;
- in a patient with alcohol addiction, the binge lasts more than seven days;
- The patient has bronchial asthma, diabetes mellitus, and cardiovascular diseases.
If you use an IV without taking into account contraindications, this can result in serious complications. Therefore, it is better to be treated in a hospital setting. If a patient exhibits symptoms of alcoholic psychosis, then it is necessary to hospitalize him.